
Deploying Server Database Version on Vercel
This article will detail how to deploy the server database version of LobeHub on Vercel, including: 1) database configuration; 2) identity authentication service configuration; 3) steps for setting up the S3 storage service.
Before proceeding, please make sure of the following:
- Export all data, as after deploying the server-side database, existing user data cannot be automatically migrated and can only be manually imported after backup!
- When configuring the environment variables required for the server-side database, make sure to fill in all of them before deployment, otherwise you may encounter database migration issues!
1. Configure the Database
Prepare the Server Database Instance and Obtain the Connection URL
Before deployment, make sure you have prepared a Postgres database instance. You can choose one of the following methods:
A.Use Serverless Postgres instances like Vercel / Neon;B.Use self-deployed Postgres instances like Docker.
The configuration for both methods is slightly different, and will be distinguished in the next step.
Add Environment Variables in Vercel
In Vercel's deployment environment variables, add DATABASE_URL and other environment variables, and fill in the Postgres database connection URL prepared in the previous step. The typical format for the database connection URL is postgres://username:password@host:port/database.
Please confirm the Postgres type provided by your vendor. If it is Node Postgres, switch to
the Node Postgres Tab.
Variables to be filled for Serverless Postgres are as follows:

An example of filling in Vercel is as follows:
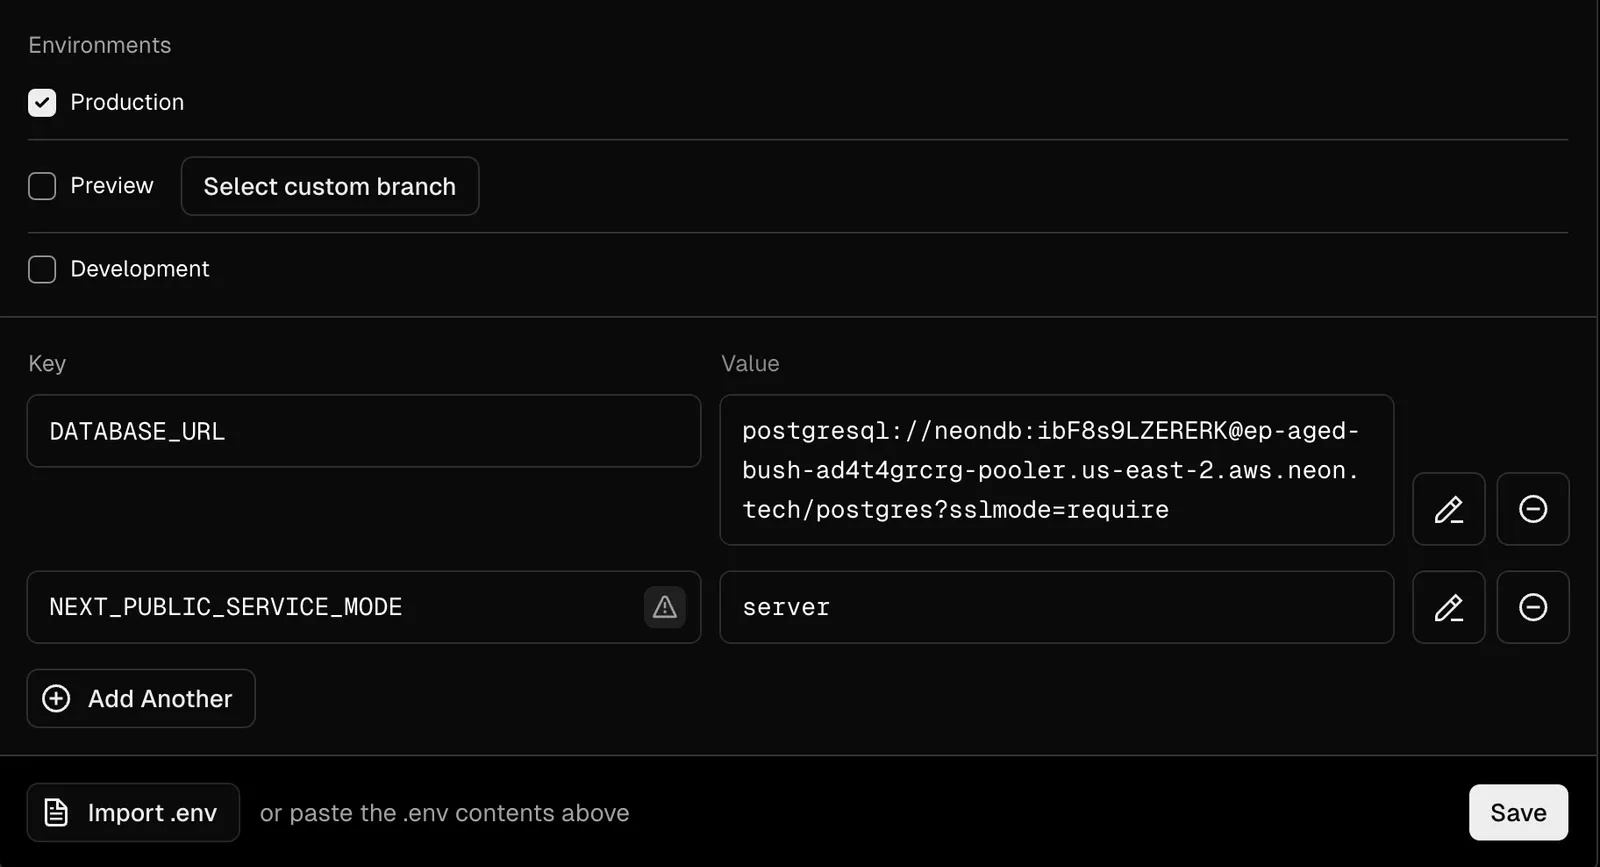
If you wish to enable SSL when connecting to the database, please refer to the link for setup instructions.
Add the KEY_VAULTS_SECRET Environment Variable
After adding the DATABASE_URL environment variable for the database, you need to add a KEY_VAULTS_SECRET environment variable. This variable is used to encrypt sensitive information such as apikeys stored by users. Click the button below to generate:
KEY_VAULTS_SECRET='Click button to generate'Make sure to add this to the Vercel environment variables as well.
Add the APP_URL Environment Variable
Finally, you need to add the APP_URL environment variable, which specifies the URL address of the LobeHub application.
2. Configure Authentication Service
The server-side database needs to be paired with a user authentication service to function properly. Therefore, the corresponding authentication service needs to be configured.
Add Authentication Environment Variables
In Vercel's deployment environment variables, add the following environment variables to enable authentication (powered by Better Auth):
Click the button below to generate AUTH_SECRET (session encryption key):
AUTH_SECRET='Click button to generate'You also need to configure the JWKS_KEY environment variable for signing and verifying JWTs. Click the button below to generate:
JWKS_KEY='Click button to generate'With these variables, users can register and login with email and password.
For advanced features like SSO providers, magic link login, and email verification, see Authentication Service.
By completing these steps, you have successfully configured the authentication service. Next, we will configure the S3 storage service.
3. Configure S3 Storage Service
In the server-side database, we need to configure the S3 storage service to store files.
In this article, S3 refers to a compatible S3 storage solution, which supports object storage systems that comply with the Amazon S3 API. Common examples include Cloudflare R2, Alibaba Cloud OSS, etc., all of which support S3-compatible APIs.
Configure and Obtain S3 Bucket
You need to go to your S3 service provider (such as AWS S3, Cloudflare R2, etc.) and create a new storage bucket. The following steps will use Cloudflare R2 as an example to explain the creation process.
The interface of Cloudflare R2 is shown below:
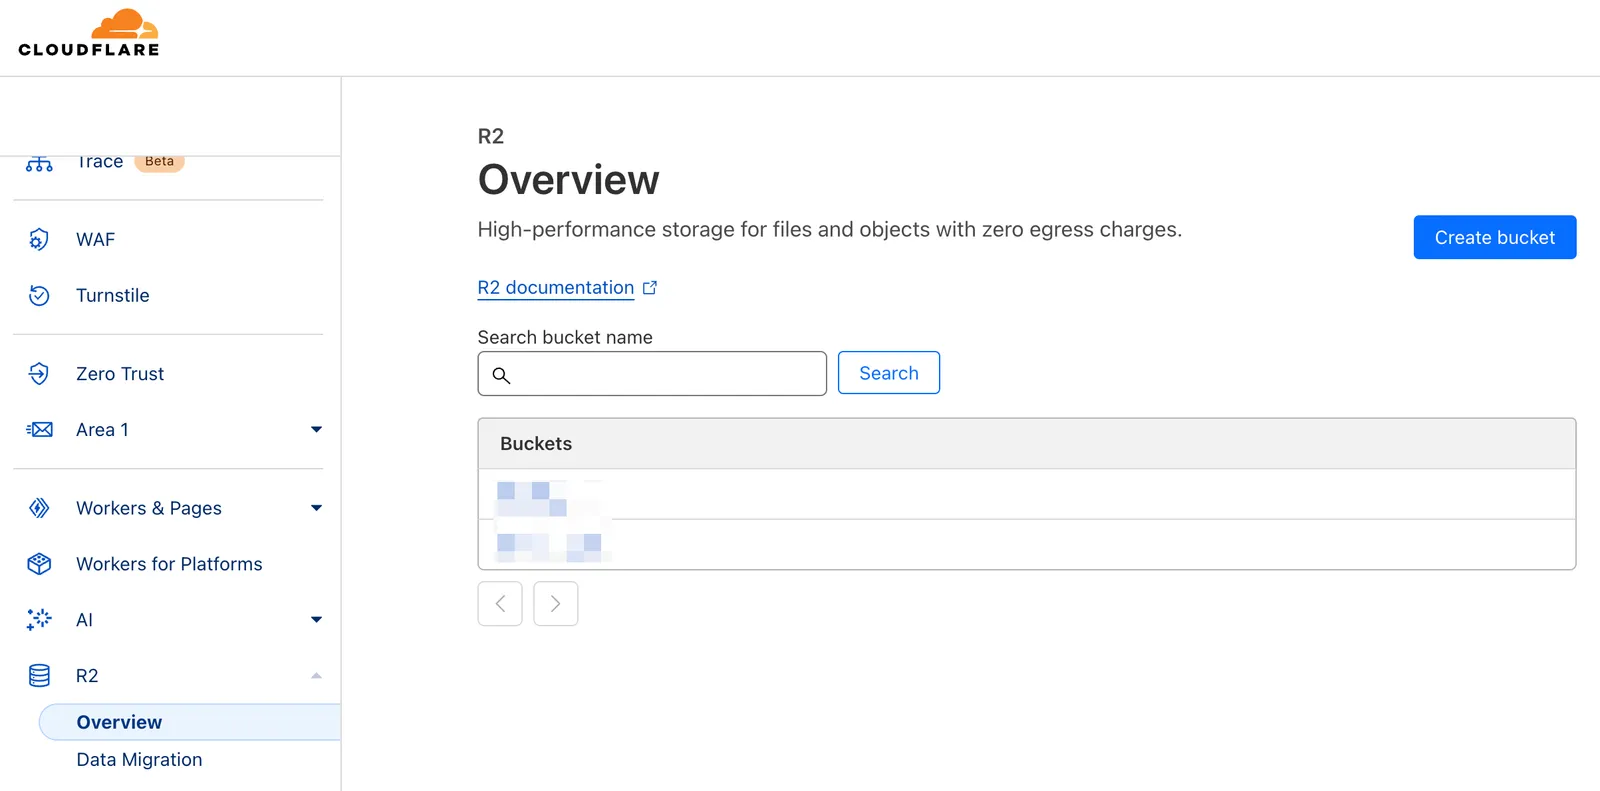
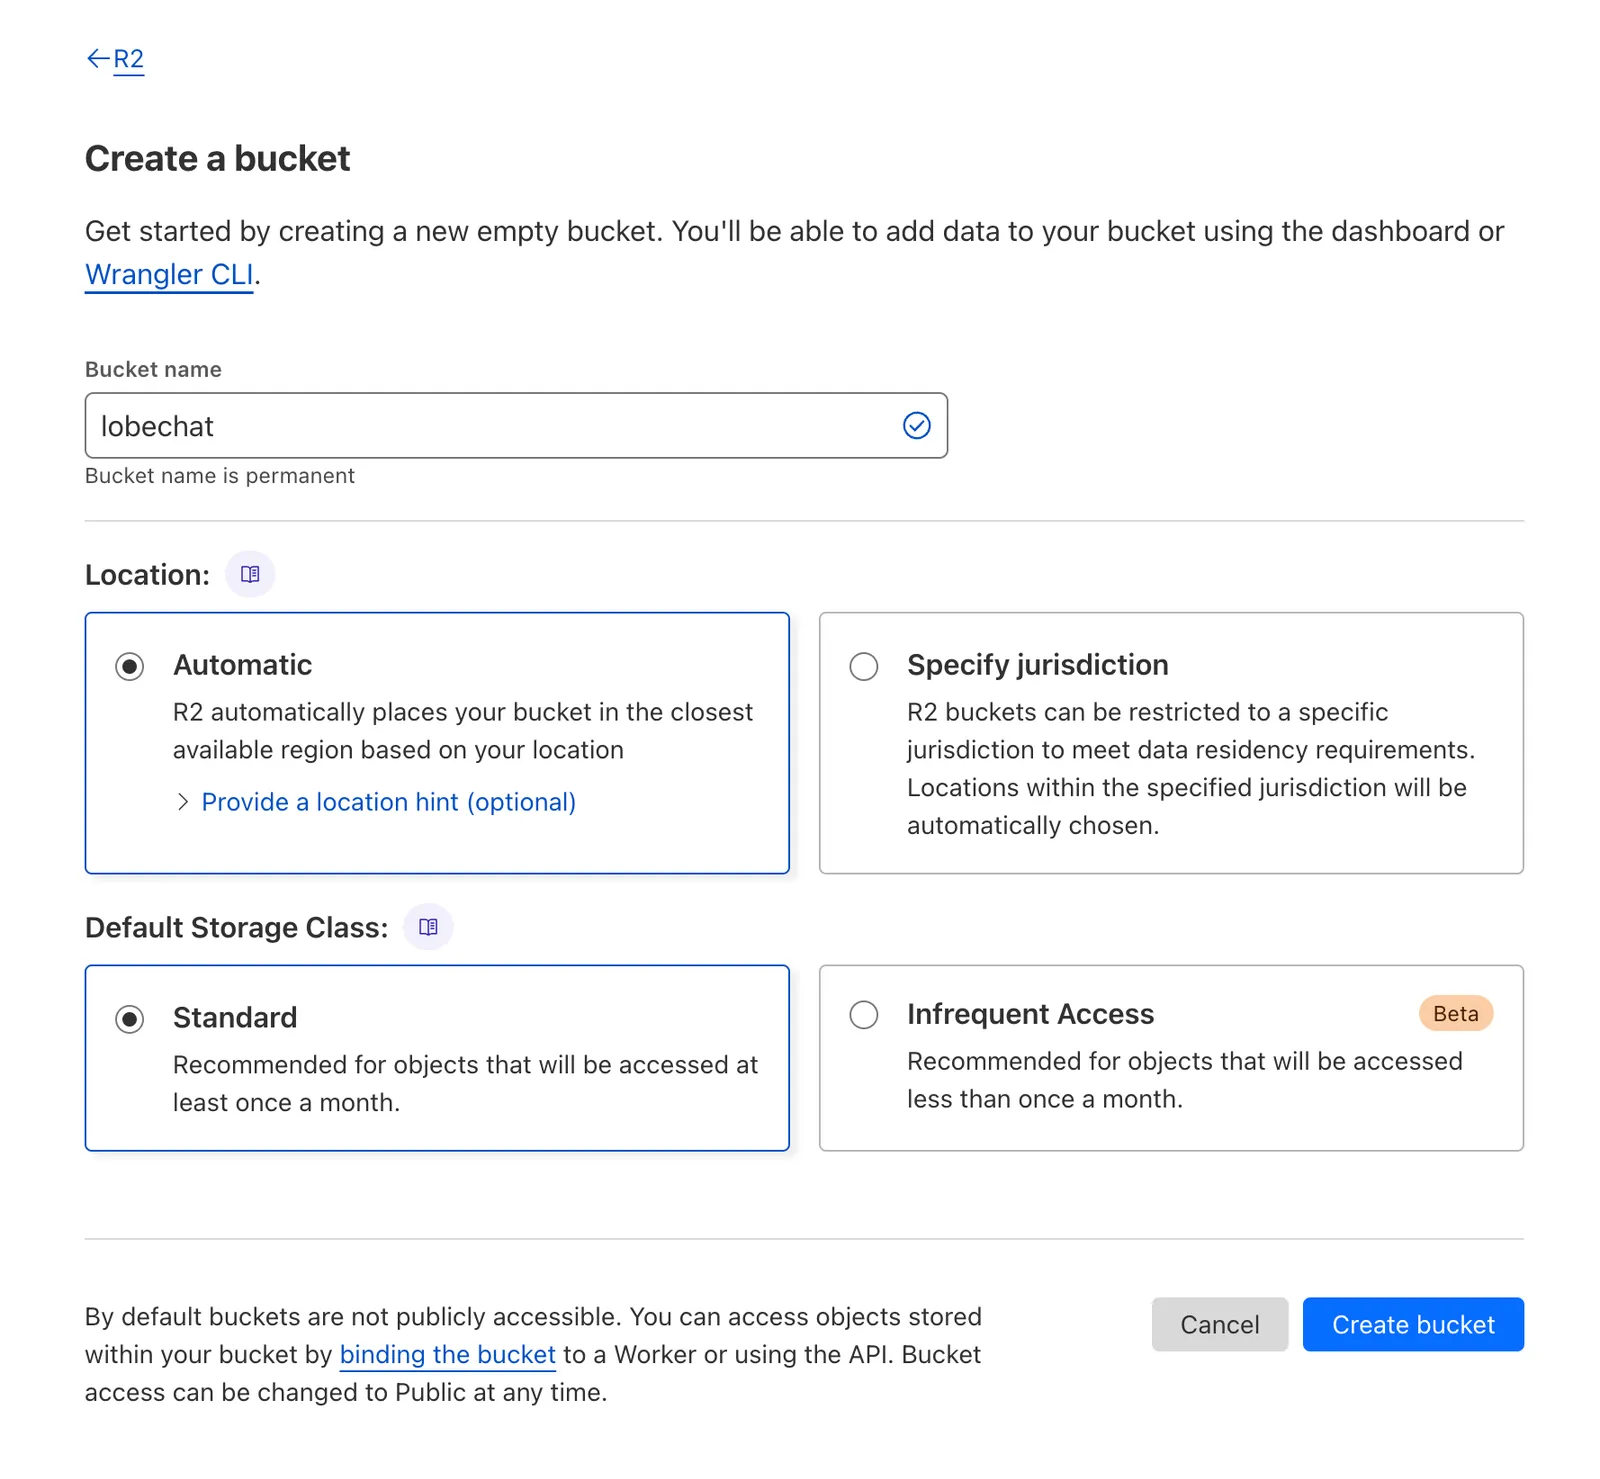
When creating a storage bucket, specify its name and then click create.
Obtain Environment Variables for the Bucket
In the settings of the R2 storage bucket, you can view the bucket configuration information:
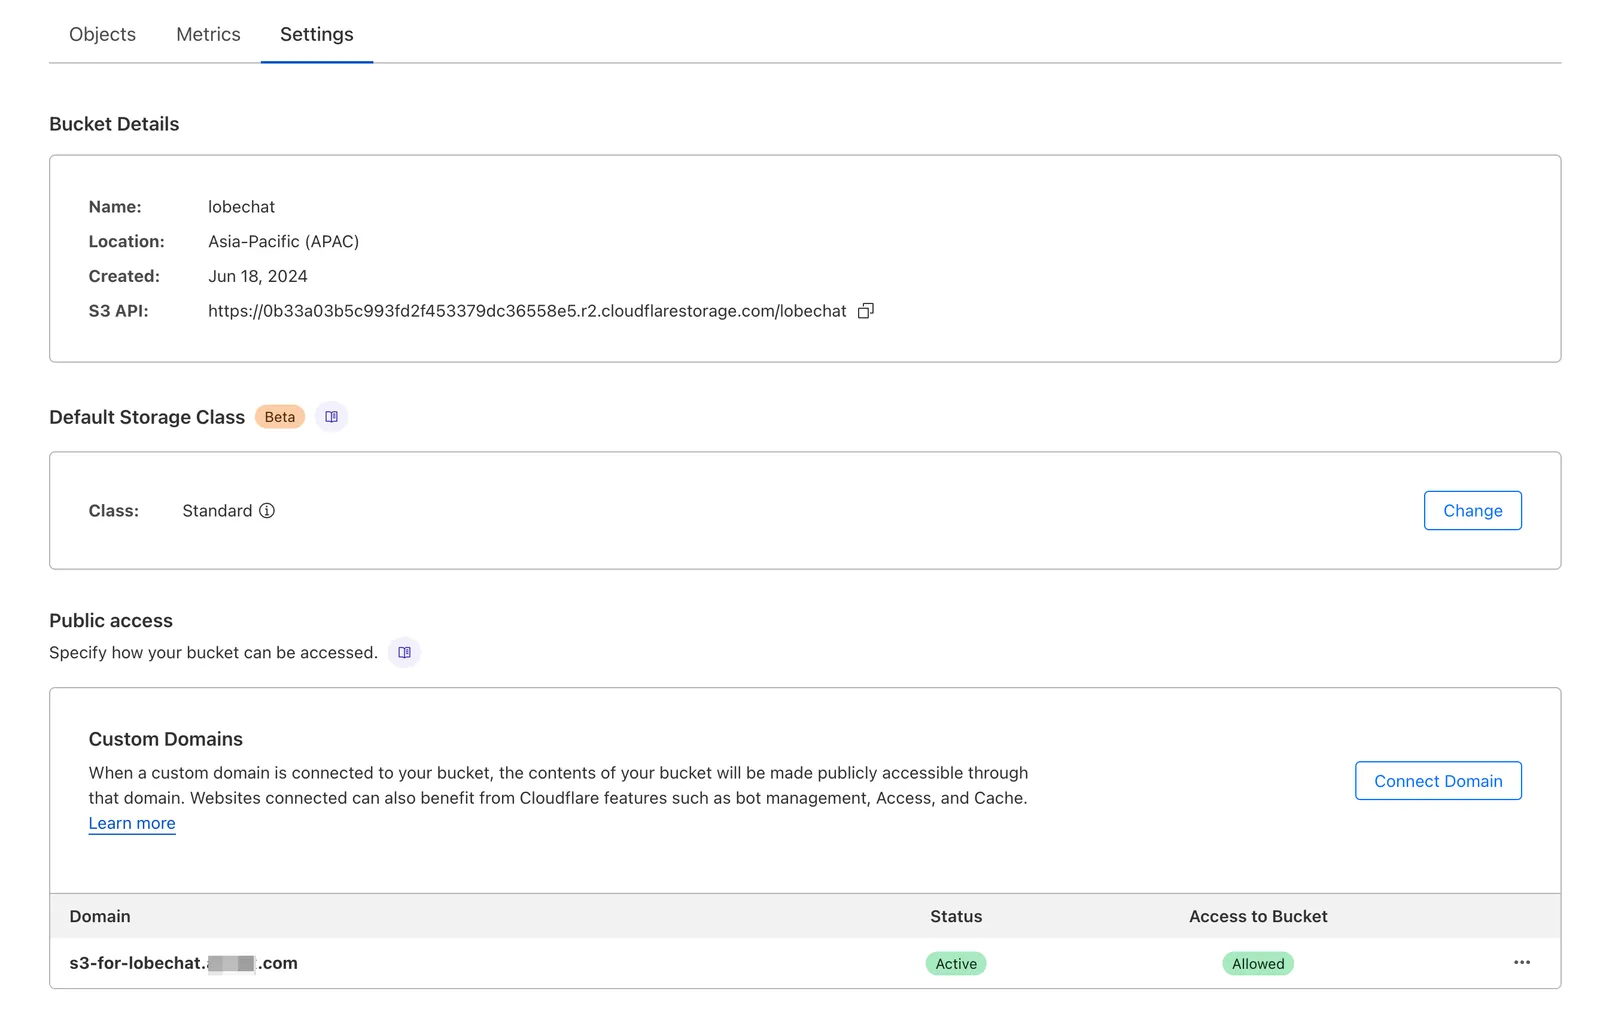
The corresponding environment variables are:
S3_ENDPOINT must have its path removed, otherwise uploaded files will not be accessible
Obtain S3 Key Environment Variables
You need to obtain the access key for S3 so that the LobeHub server has permission to access the S3 storage service. In R2, you can configure the access key in the account details:
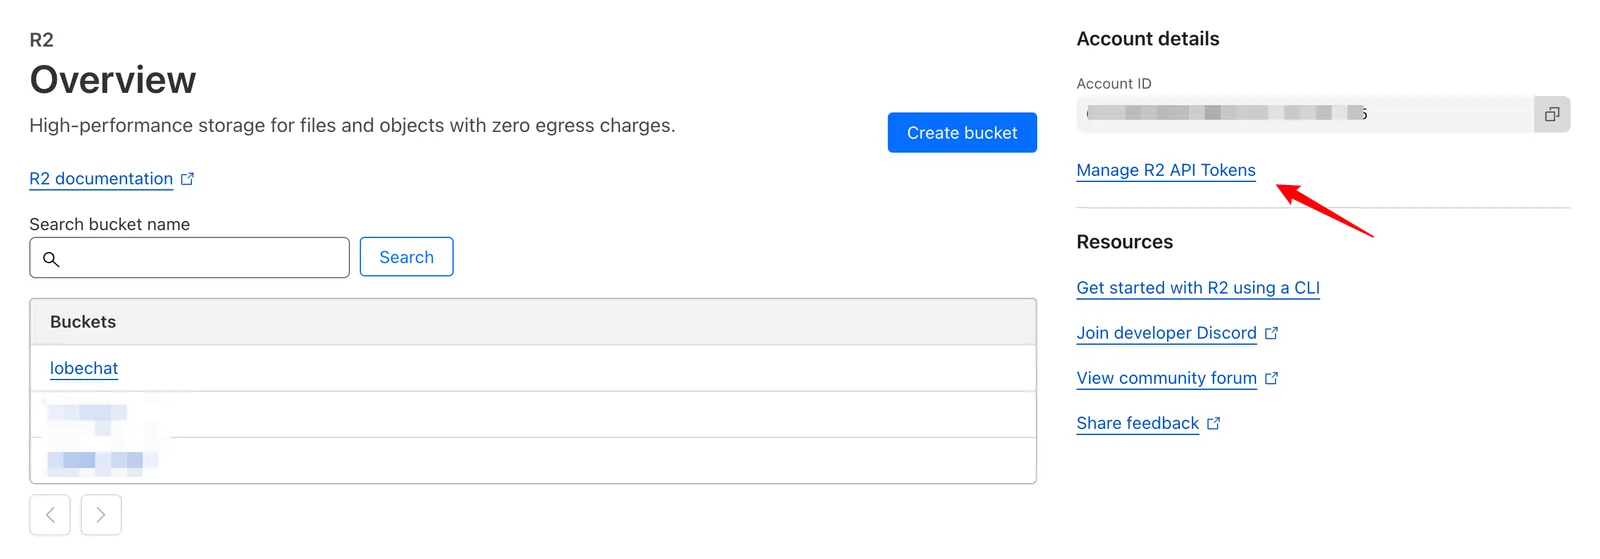
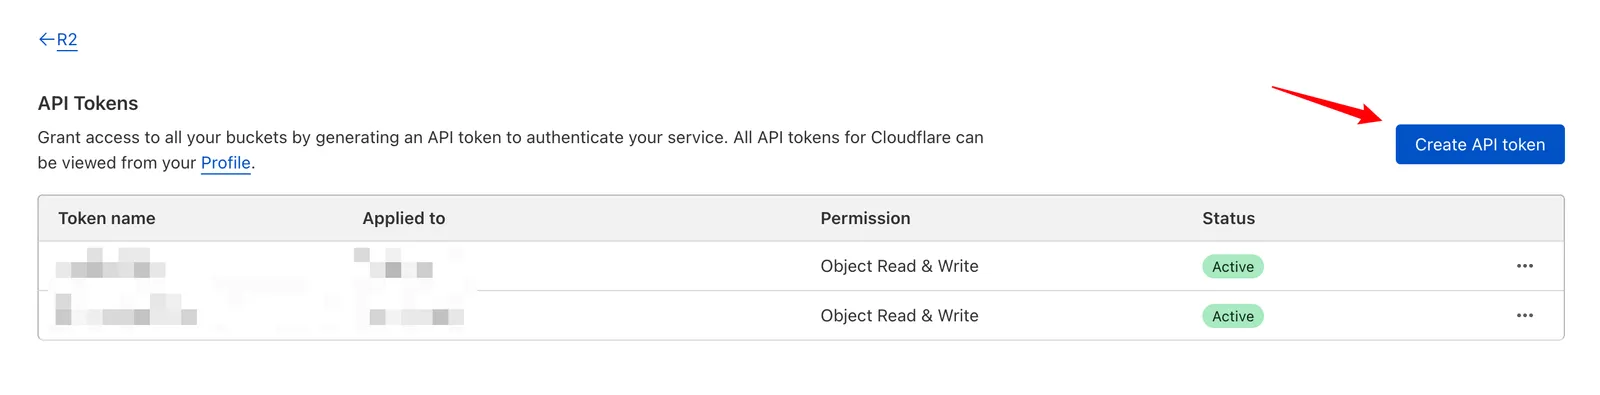
Click the button in the upper right corner to create an API token and enter the create API Token page.
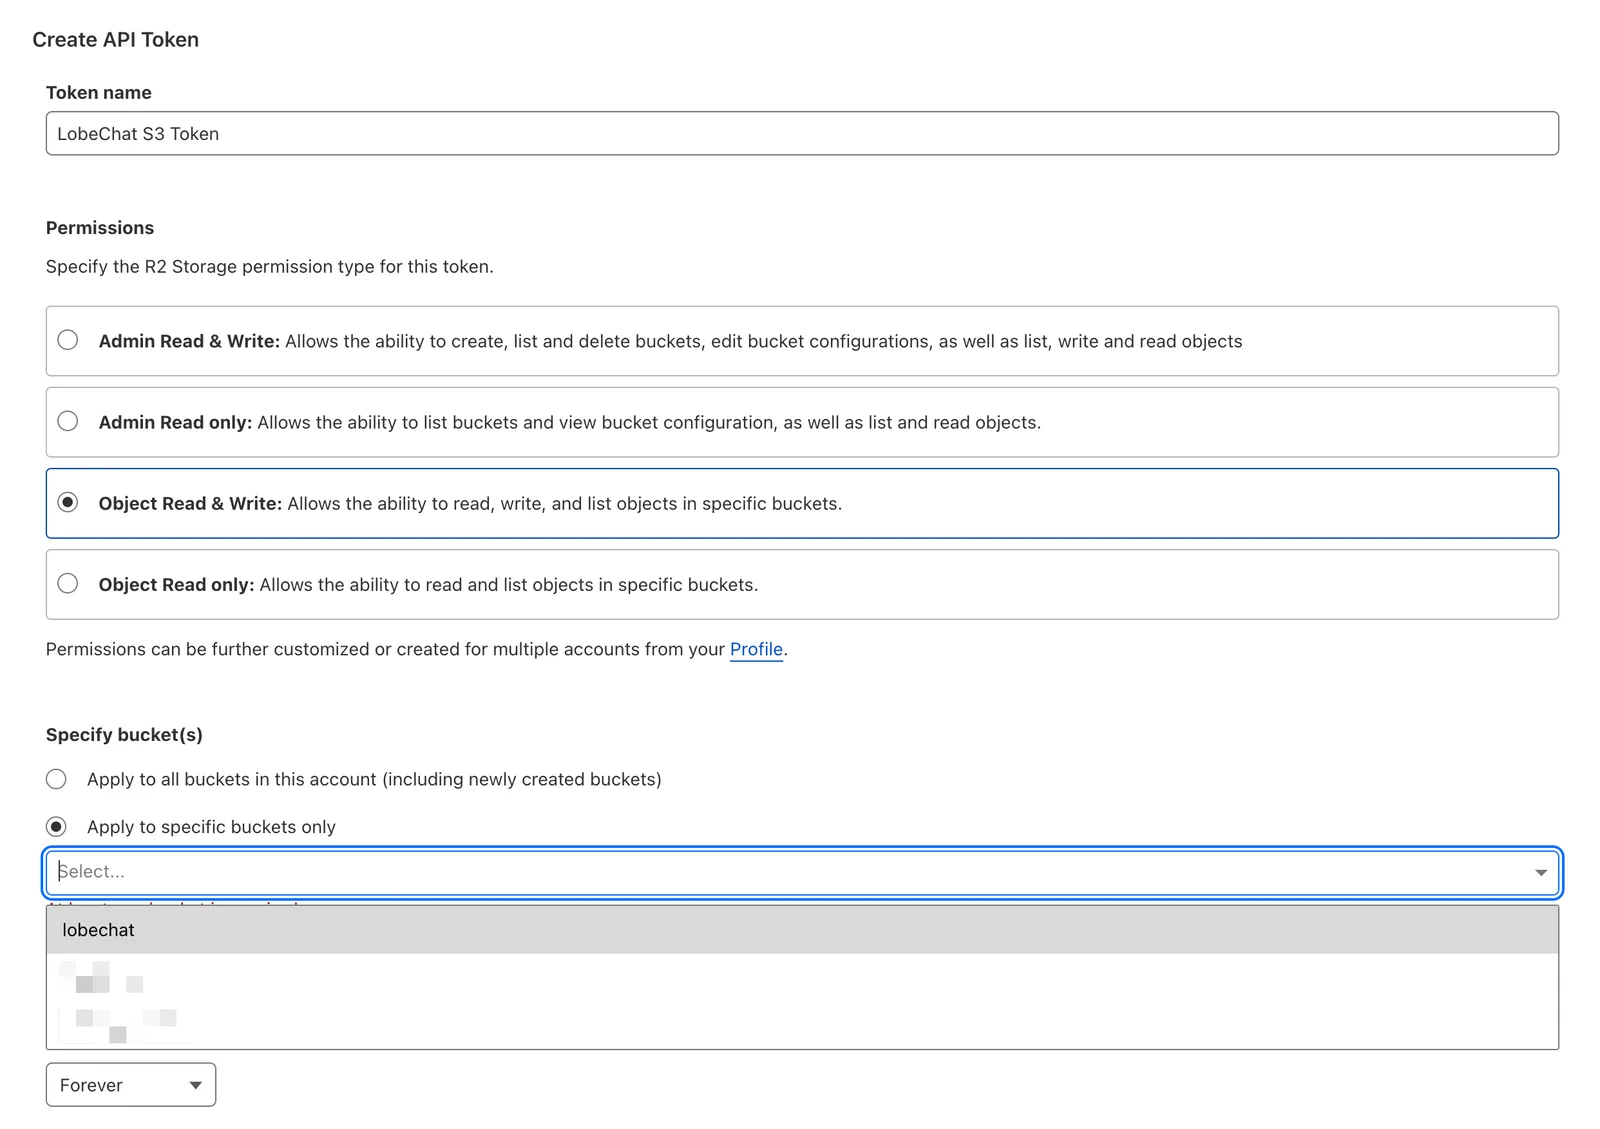
Since our server-side database needs to read and write to the S3 storage service, the permission needs to be set to Object Read and Write, then click create.
After creation, you can see the corresponding S3 API token.
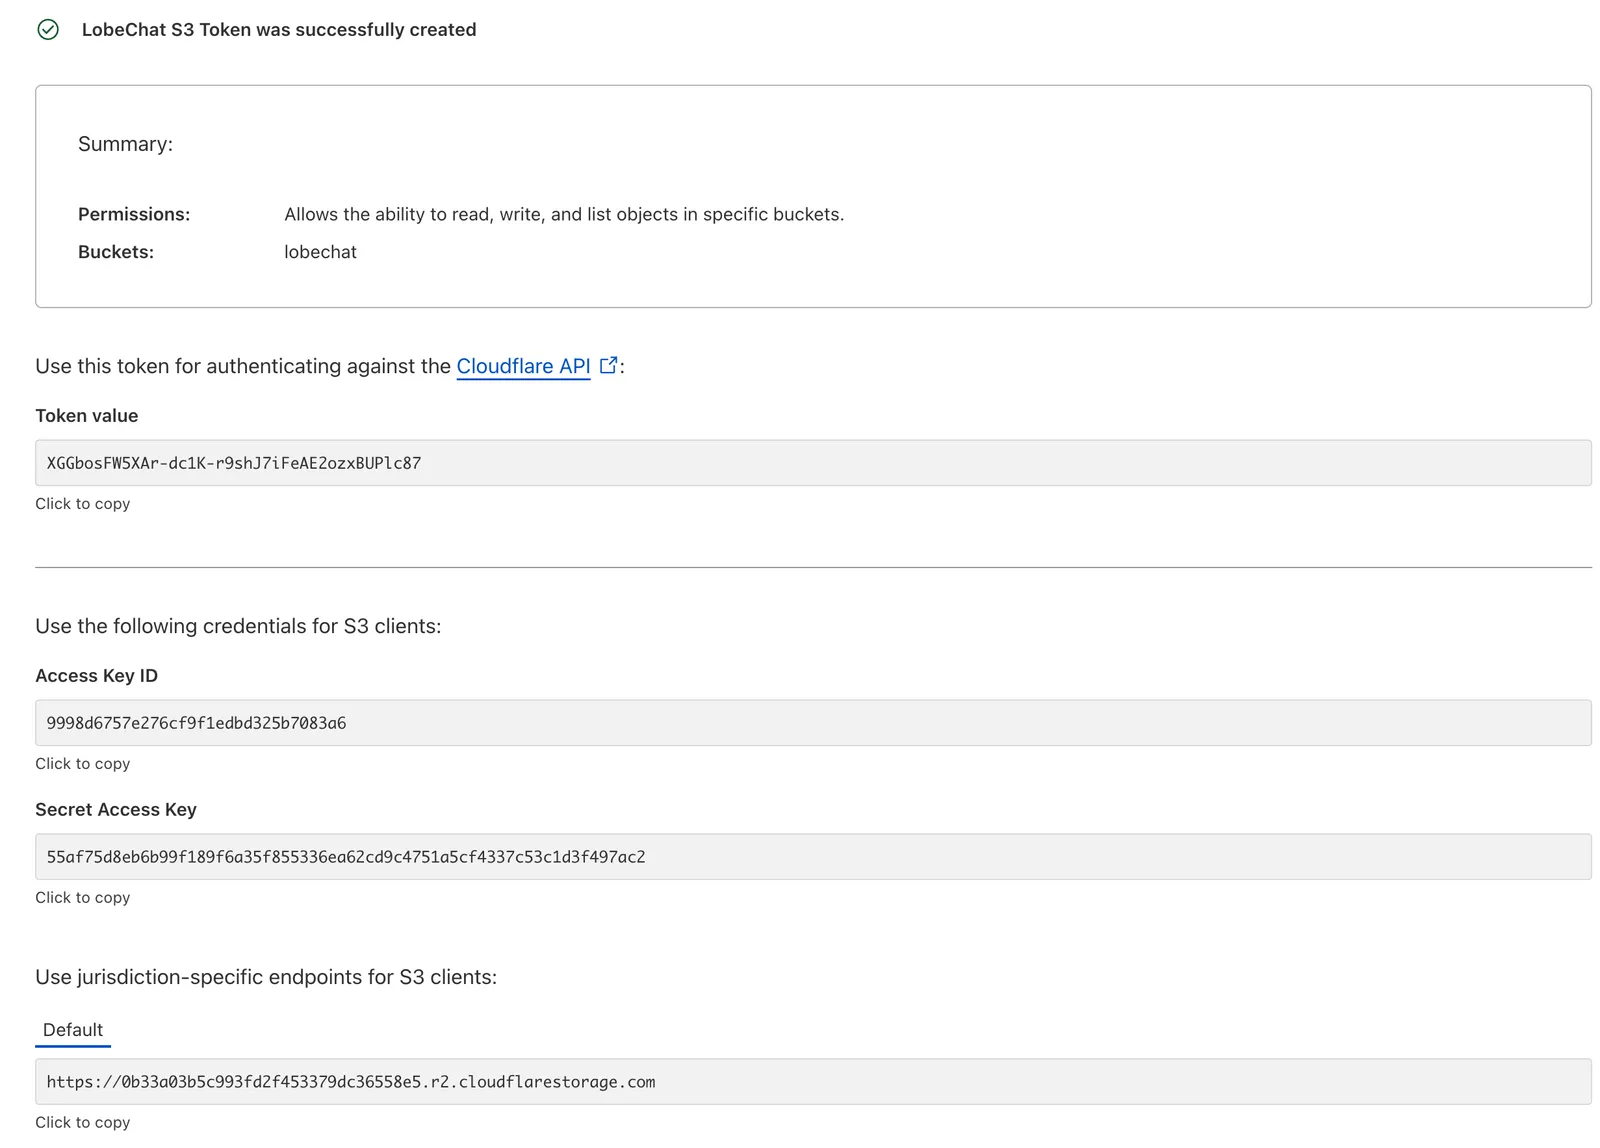
The corresponding environment variables are:
Adding Corresponding Environment Variables in Vercel
The steps to obtain the required environment variables may vary for different S3 service providers, but the obtained environment variables should be consistent:
The https:// in the URL is essential and must be maintained for the completeness of the URL.
Then, insert the above environment variables into Vercel's environment variables:
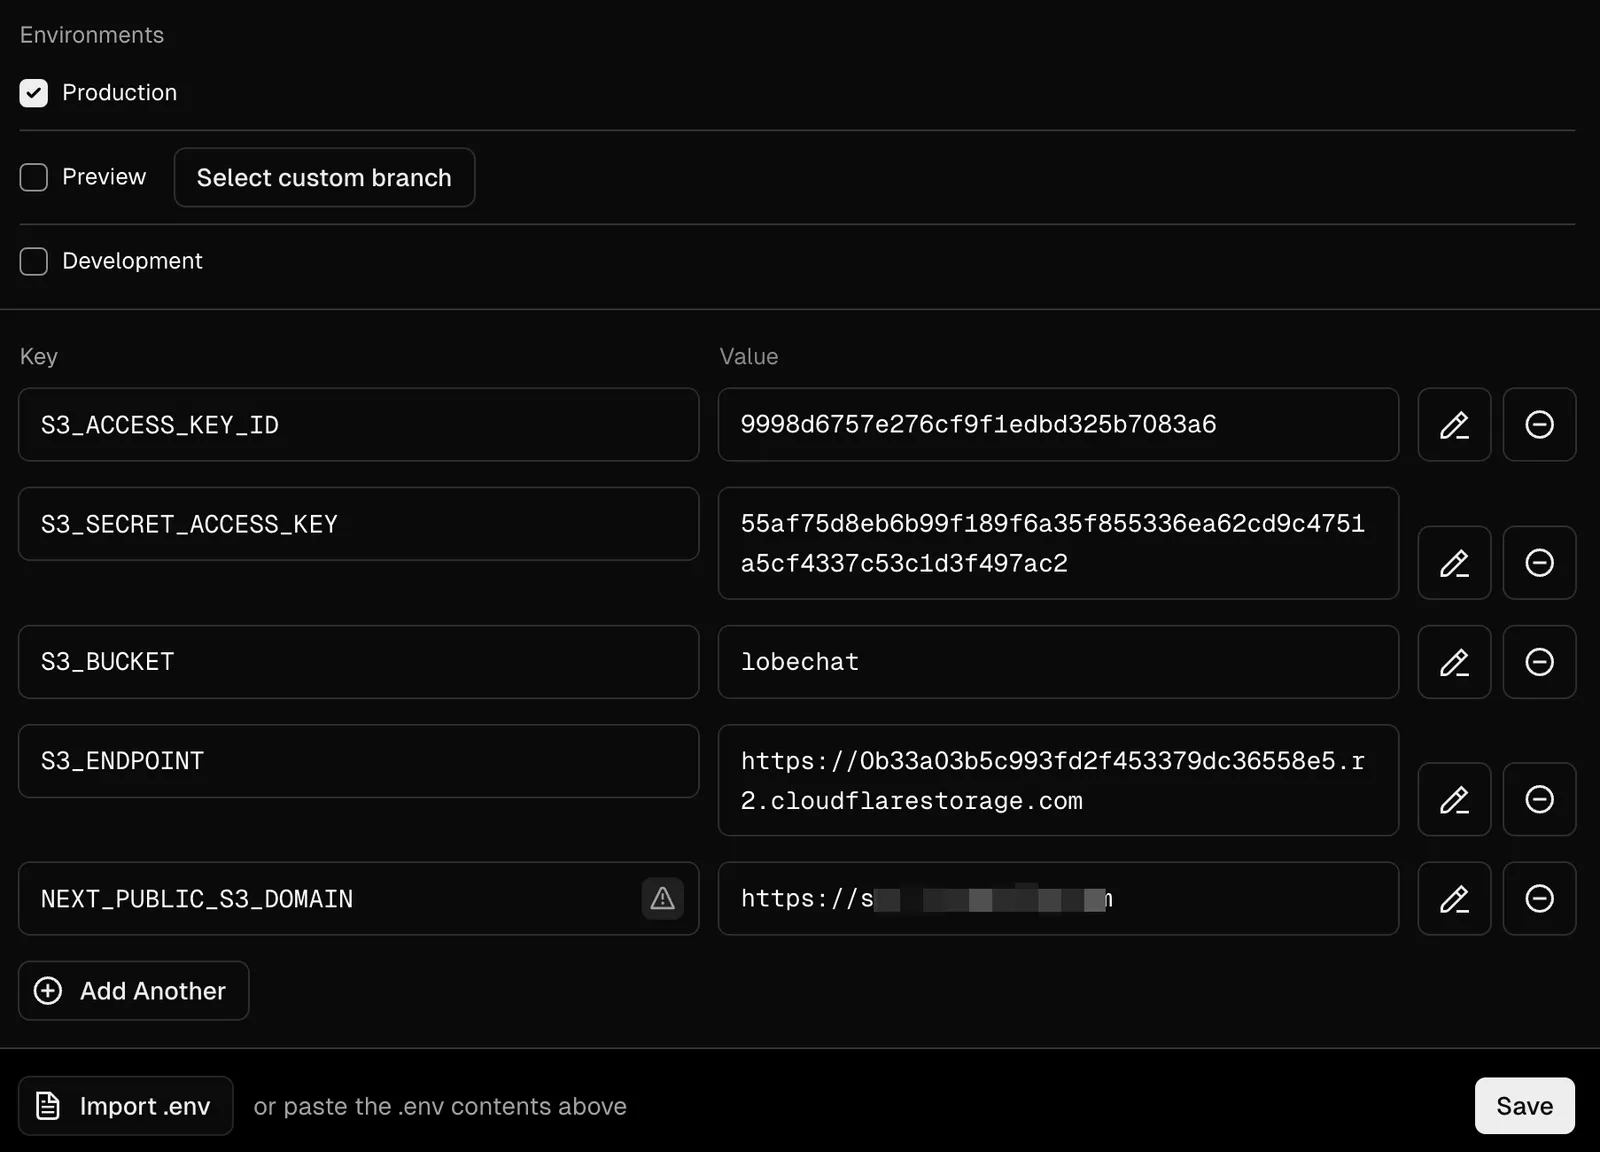
Configuring Cross-Origin Resource Sharing (CORS)
Since S3 storage services are often on a separate domain, cross-origin access needs to be configured.
In R2, you can find the CORS configuration in the bucket settings:
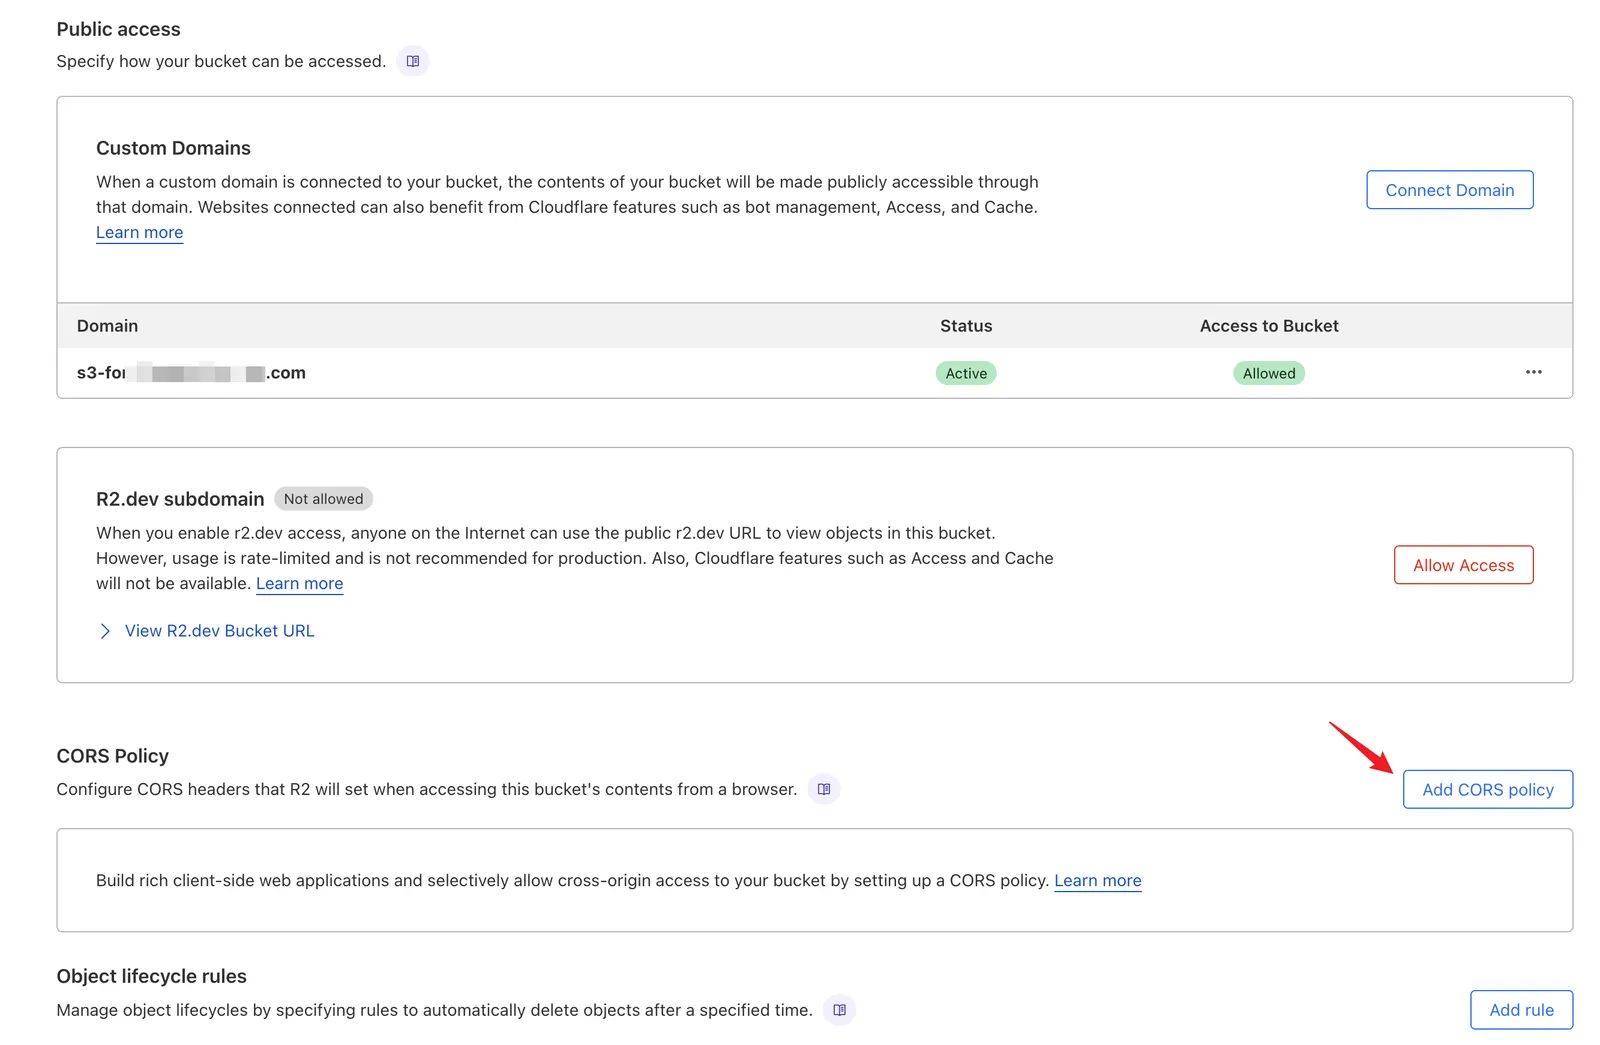
Add a CORS rule to allow requests from your domain (in this case, https://your-project.vercel.app):
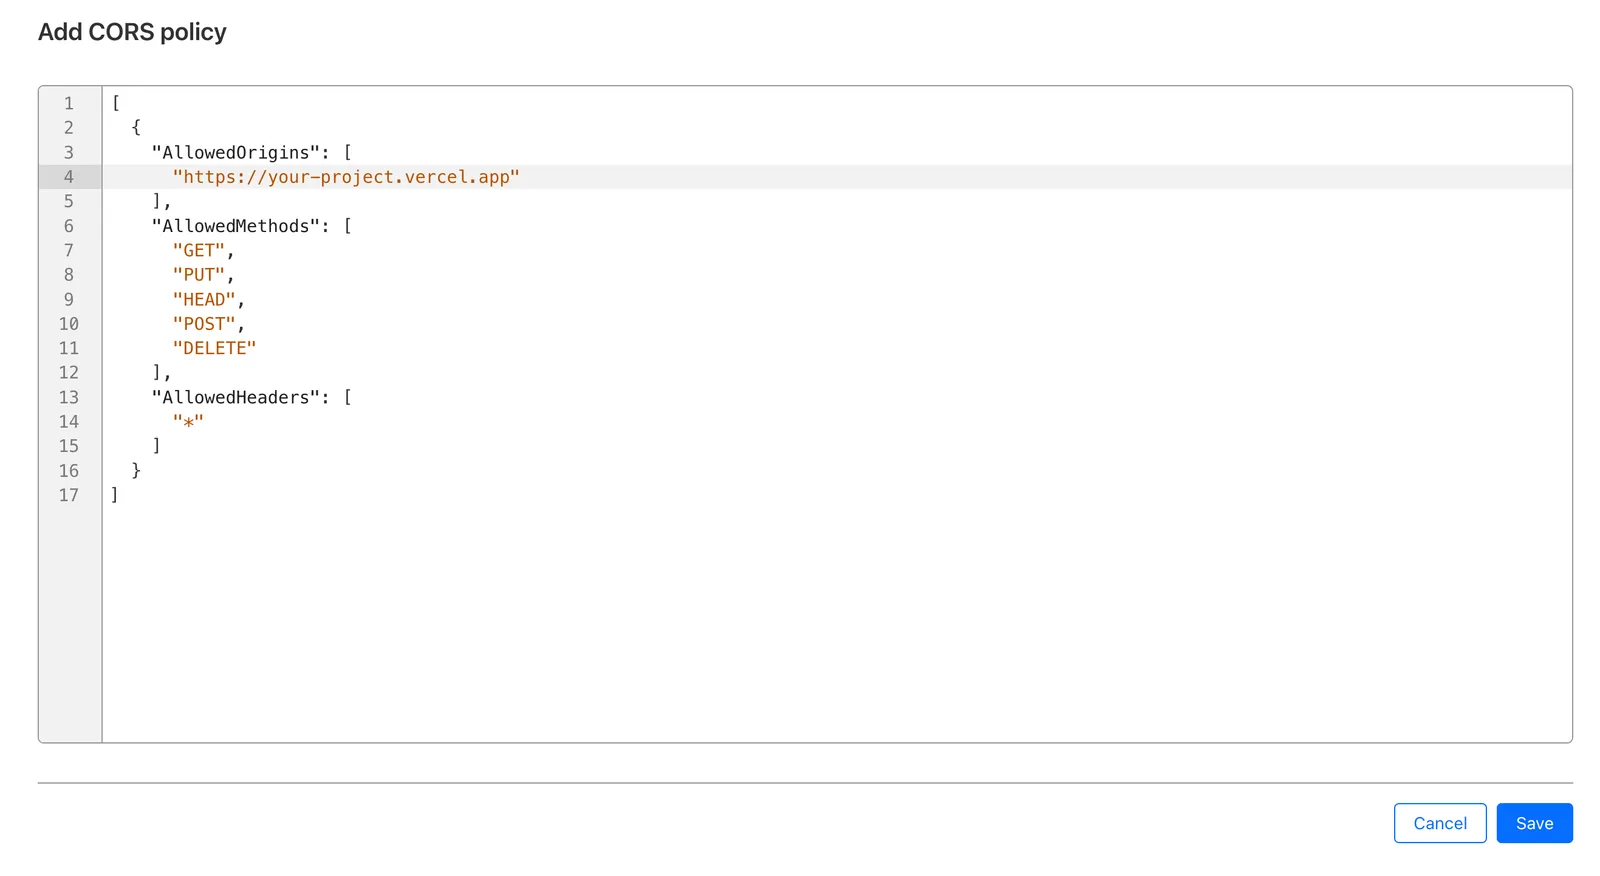
Example configuration:

After configuring, click save.
Four, Deployment and Verification
After completing the steps above, the configuration of the server-side database should be done. Next, we can deploy LobeHub to Vercel and then visit your Vercel link to verify if the server-side database is working correctly.
Redeploy the latest commit
After configuring the environment variables, you need to redeploy the latest commit and wait for the deployment to complete.
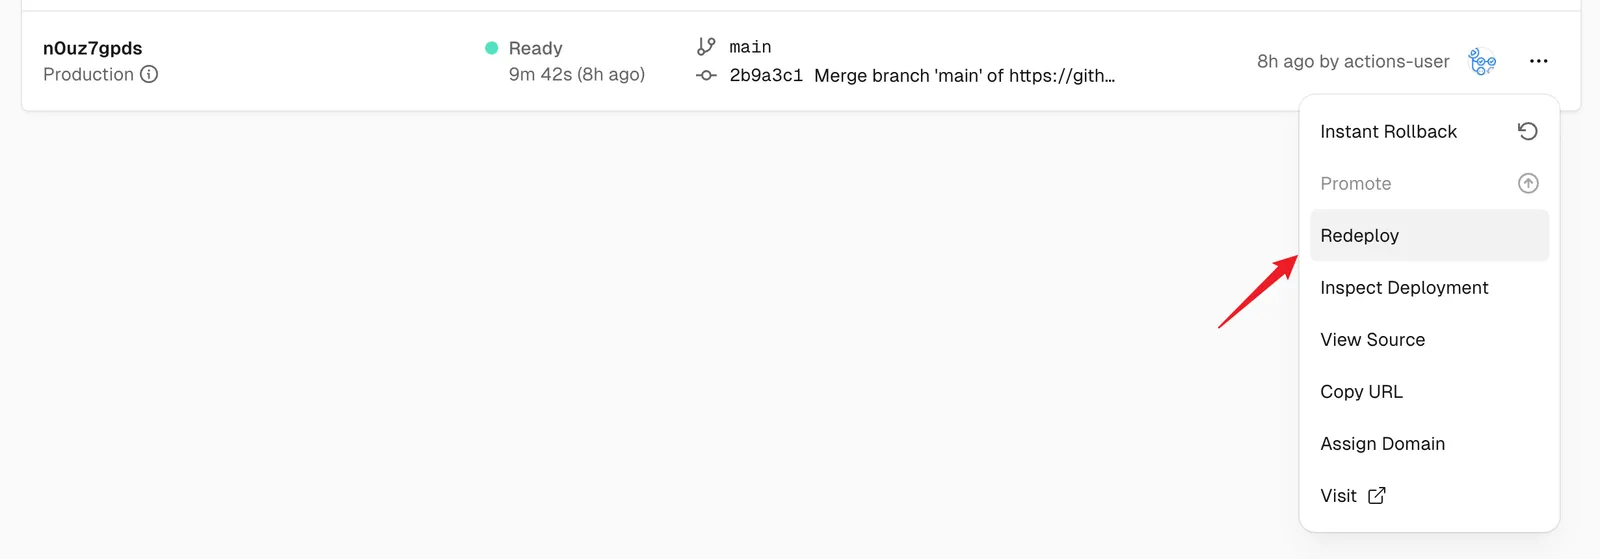
Check if the features are working properly
If you click on the login button in the top left corner and the login popup appears normally, then you have successfully configured it. Enjoy using it~


Optional: Prebuild with GitHub Actions
If a Vercel build fails because it runs out of memory or exceeds the build time limit, you can run vercel build in GitHub Actions and then deploy the generated .vercel/output with vercel deploy --prebuilt. This follows Vercel's official GitHub Actions deployment workflow.
This approach only moves the build stage to GitHub Actions. Vercel's function runtime, traffic, and plan quotas still apply after deployment. If Vercel's native Git deployment completes successfully, you do not need this workflow.
Prepare Vercel credentials
Prepare these three values:
VERCEL_TOKEN: Create one on the Vercel Tokens page.VERCEL_ORG_IDandVERCEL_PROJECT_ID: Runvercel linkin the repository root, then copy them from the generated.vercel/project.jsonfile.
In your fork, open Settings → Secrets and variables → Actions and create a Repository secret for each value using the same name. Do not write these values directly into the workflow file.
Add the GitHub Actions workflow
Create .github/workflows/vercel-prebuilt-deploy.yml in your fork with the following content:

The workflow builds and deploys whenever you push to main. You can also trigger it manually from Actions → Vercel Prebuilt Deploy → Run workflow.
The repository's built-in Upstream Sync workflow pushes with GITHUB_TOKEN, which does not start another workflow run. After Upstream Sync updates your fork, run Vercel Prebuilt Deploy manually to deploy the new version.
Disable Vercel's native Git deployment
After confirming that the workflow deploys successfully, open Settings → Git → Connected Git Repository in your Vercel project and disconnect the Git repository. This prevents the same push from triggering both a native Vercel build and a GitHub Actions build. Disconnecting the repository does not affect prebuilt deployments made with the Vercel CLI.
Verify the deployment
Open the GitHub Actions run details. The Deploy prebuilt output step prints the production deployment URL. Visit it and verify the login flow described in the previous section.
Platform Limitations
Be aware of these Vercel platform limitations before deploying.
Serverless function timeout:
| Plan | Timeout |
|---|---|
| Hobby | 10 seconds |
| Pro | 60 seconds |
| Enterprise | 900 seconds |
Long-running AI requests may timeout on the Hobby plan. Streaming responses (enabled by default) help keep connections alive.
No WebSocket support — Vercel serverless functions don't support persistent WebSocket connections. Real-time features use Server-Sent Events (SSE) instead.
Cold starts — Serverless functions may be slower on first request after idle periods (1–3 seconds). This is normal behavior for serverless platforms.
File size limits — Deployment size: 250 MB (compressed). Function size: 50 MB.
Keeping Updated
If you used the one-click deploy button, Vercel creates a new repository instead of forking the original. This prevents automatic upstream updates.
To receive future LobeHub updates:
- Delete the current project from Vercel dashboard (Settings → Delete Project)
- Manually fork lobehub/lobehub on GitHub
- Import your forked repository to Vercel (Add New → Project)
- Re-configure your environment variables and deploy
- In your fork's GitHub Actions tab, enable the
upstream-syncworkflow — it automatically checks for updates daily
To sync manually: Actions → Upstream Sync → Run workflow.
Troubleshooting
Deployment fails — Check build logs in Vercel Dashboard → Deployments → click the failed deployment → Build Logs. Common causes: missing environment variables, TypeScript errors, or out of memory (fix with NODE_OPTIONS=--max-old-space-size=4096, preferably for the build step only: a heap flag that also applies at runtime overrides the parse worker's 768 MB memory limit, so file parsing then runs with the larger limit and logs file_parse.heap_budget_overridden once).
Function timeout — If requests timeout on Hobby plan: upgrade to Pro (60s timeout), use faster AI models (e.g., GPT-4o-mini instead of GPT-4o), reduce max tokens, or ensure streaming is enabled.
Database connection fails — Verify DATABASE_URL format. Ensure ?sslmode=require is appended for managed databases. Check that the database's IP allowlist includes Vercel IPs (or use 0.0.0.0/0 for open access). Test locally with psql "$DATABASE_URL".
502 Bad Gateway — Common causes: function timeout, out of memory, or database connection pool exhausted. Use a connection pooler (PgBouncer), reduce concurrent connections, or check database logs.
Environment variables not updating — After changing env vars, go to Deployments → Redeploy (three dots menu) → select "Use existing Build Cache: No".
Appendix
Overview of Server-side Database Environment Variables
For easy copying, here is a summary of the environment variables required to configure the server-side database: